[Interaction 1] Prototype: Flower-Blooming Mechanism [Technical Coding]
Process
Installation
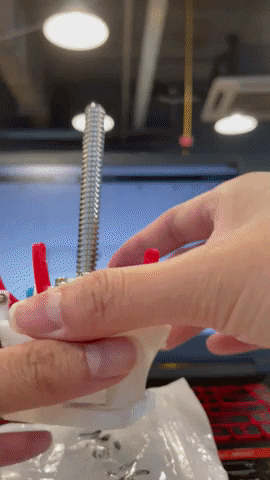
1. Attaching all the M2, M3 screws, and T8 Lead Screw on the 3D printed parts
Notes:
T8 Lead Screw: 8mm diameter
Pitch: 2mm (Lower pitch, lower speed, higher accuracy)
Lead: 2mm (The nut moves 2mm in one turn)

2, Before installing it on the stepper motor, I test it on the lead screw motion.
3. The structure after attaching the 3D printed parts on the motor (including coupling -5mm & 8mm)

Technical Part
.png)
I'm using DRV8825 for the driver to control the stepper motor. The reason is that it can resist a higher voltage motor power supply (45V) so that the driver will not get burnt easily. Before hands on the coding part, it is a must to adjust the reference voltage of the potentiometer using multimeter.
Notes:
Here is the formula: I(A) = P(W) / V(V)
DRV8825 : 2 pins (STEP & DIR)
Maximum output capacity of 45 V and ± 2 A
Current limit: 0.85A, Rated Current 1.7A --- based on the model of the stepper motor

Steps to Adjust Reference Voltage
1. Connect the Arduino Nano to the laptop
2. Connect to 12V power supply (Don't have to connect to the stepper motor at first)
3. Red pen tool on the potentiometer, Black pen tool on any ground pin (I place it on the USB connector on the Arduino Nano)
4. Use a screwdriver to adjust the voltage accordingly (0.5 - 0.85A)
Wiring
Wiring based on tutorial. 12V power supply is connected to the driver to control the stepper motor. 5V power supply is connected to Arduino

Technical Experimentations
Usually, the steps per revolution of the stepper motor are 200. However, the motor is not functioning well and it could not trigger the output arm to move. Here are the experimentations of different coding by changing the value of steps per revolution.
Final Result
I'm not sure why the steps per revolution are 100, this might be due to the model that I'm using.
Notes:
2mm -- 100 steps -- 1 turn
9mm -- 450 steps
DIR Pin Low - Counterclockwise
DIR Pin High - Clockwise
Step Pin Low - Downward motion
Step Pin High - Upward motion
Circuit Diagram

Conclusion
The mechanism seems working, but it will crash sometimes when moving down. (closing movement) and the vibration of the stepper motor is loud and noisy, so it has to be fixed in the next progress. I also have to start to attach petals to see the visual of it.
Bibliography
How2electronics(2021) How to Control Stepper Motor with DRV8825 Driver & Arduino. Nov 16. Available at: LINK
Arduino (2022) Arduino and Stepper Motor Configurations. July 7. Available at: LINK
Makerguides (n.d) How to control a stepper motor with DRV8825 driver and Arduino. Available at: LINK

.png)

Comments
Post a Comment